2020年11月3日火曜日

散髪

いつの間にかまた伸び放題になっていたので自宅で散髪。

バリカンだけで仕上げてもらったが今一つ髪がまとまらない(^^;

ちょっとおかしな気がするが、まぁ素人仕事なので仕方がない。

これで会社に出るか(^^;;;

2020年10月3日土曜日

macos CatalinaでNFSサーバを動かし、RP4Bから/マウントする

macos側の設定は、下記を参考にした。

MacOS X で NFSサーバーを構築する
Mac OS X で NFS を使う
 

その結果のサーバ側の/etc/exportsの設定は下記。

/Users/shibata/RP4Bnfs/root -maproot=root -alldirs -network 192.168.0.0 -mask 255.255.255.0

RP4B側は、ubuntu20.04を動かしているが、microSDでブートだけさせる。
/boot/firmware/cmdline.txtの設定は下記。

net.ifnames=0 dwc_otg.lpm_enable=0 console=tty1 root=/dev/nfs nfsroot=192.168.0.102:/Users/shibata/RP4Bnfs/root,tcp,rw ip=dhcp rootfstype=nfs elevator=deadline rootwait fixrtc

2020年9月26日土曜日

散髪

久々に出張先で散髪。 午後から披露宴出席があるので、ご両家に失礼が無いように 素人散髪を隠してもらうつもり。 あれこれ調べて、昔の職場の近くの「ミヤモリ」さんに行くことにした。 実は初めて。 いわゆるフルコースで税込4950円だったが、さすがにプロ。 耳かき、爪磨き、ヘッドマッサージもありで大満足だった。 やはりたまには良い床屋さんでやってもらうのは良いな(^^)

2020年9月8日火曜日

散髪

今回も自宅で散髪。 床屋さんに行きたいのは山々なんだが、 雨だったり暑かったり気が乗らんかったり。 カミサンにバリカン6mmで上まで刈り上げてもらい トップは適当にハサミで。 まぁ、在宅が多いのでこれでなんとかなるか(^^;

2020年8月14日金曜日

散髪

 クソ暑いのと感染リスク低減を踏まえ、自宅で散髪する事に(^^;

 通販でバリカンを購入。

   #折角、国内家電メーカ製を選んだのに、届いたらMade in Chinaだった(--;
   #もう少し高いのにしたら、国内製だったのかな?

 ま、ともあれ、説明書通りに一晩充電してから、注油して初使用。

下の方は6mmで刈上げ、上の方は12mm。トップはハサミで切ってもらった。
初めてにしてはなかなかいい感じです。

当分、これでしのぐかなぁ。


2020年8月13日木曜日

macosでの/etc/fstabの編集

$ sudo su

# vifs

#
# Warning - this file should only be modified with vifs(8)
#
# Failure to do so is unsupported and may be destructive.
#
UUID=BA80B0B6-B49B-47A4-8C9F-XXXXXXXXXXXX       /Users/shibata apfs rw,auto

2020年8月9日日曜日

MacBook Pro(late 2008)でCatalinaのIMEを動かす

ずっとmacos patcherのお世話になりながらHigh Sierraで動かしていたMacBook Pro(late 2008)だが、Xcodeなどのapple謹製ソフトがインストール出来なくなり困ってきた。

#実は以前、Mojaveにしてみたのだが不安定でどうにもならなかったので、
#High Sierraに戻していた。

 駄目元でCatalinaにしてみた(^^;


【全体の手順】

1.まずはTime Machineでバックアップをとる。
  事前にできるだけ不要なファイルは消しておく。

2.macOS Catalina Patcherをダウンロードし、
  手持ちのUSBメモリをインストールメディアにする。

3.手順通りにmacos Patcherで作成したインストールメディアで起動させ、
  内蔵HDDにCatalinaをインストールする。

#と、スンナリいっているいるように書いているが、postinstallのpatchが失敗して
#駄目元で内蔵HDDからCatalinaを起動させた後にpostinstallを行なった。
#Catalinaの起動も30分ぐらいかかり、けっこう待たされた。

4.内蔵HDDからCatalina起動後、もう一度インストールメディアで起動して
  postinstall patchを実行する。

5.日本語入力がおかしくなるので、MojaveのIMEを移植する。

6.再起動すれば、出来上がり。

 肝は上記の5である。

ネットを探すと、macOS Catalina Patcher 不具合情報と解決策という、ありがたいサイトがあった。  

もう一台のmacをたまたまMojaveで動かしていたので、そちらから関係するファイルを持ってきた。

#移植先はMacintosh HD - Dataではなく、Macintosh HDの方なのだが、
#これで良かったんだろうな(^^;


【移植したファイル】

下記の青文字がMojaveから移植したファイル
同じく赤文字はCatalinaにあったファイルのバックアップ

sh-3.2# pwd
/usr/lib
sh-3.2# ls -l libmecab*
-rwxr-xr-x@ 1 root  wheel  1596512  8  9 18:07 libmecab.1.0.0.dylib
-rwxr-xr-x@ 1 root  wheel  1596512  8  9 18:07 libmecab.dylib
-rwxr-xr-x  1 root  wheel   812464  8  6 09:49 libmecab.dylib.bak
-rwxr-xr-x@ 1 root  wheel  4820080  8  9 18:07 libmecabra.dylib
-rwxr-xr-x  1 root  wheel  2881600  8  6 09:50 libmecabra.dylib.bak


sh-3.2# pwd
/System/Library/Input Methods
sh-3.2# ls -l JapaneseIM.*
JapaneseIM.app:
total 0
drwxr-xr-x@ 9 root  wheel  288  2 23  2019 Contents

JapaneseIM.bak:
total 0
drwxr-xr-x  9 root  wheel  288  6  6 15:27 Contents 


sh-3.2# pwd
/System/Library/PrivateFrameworks
sh-3.2# ls TextInput*
TextInput.framework:
Resources    TextInput    Versions

TextInput.framework.bak:
LanguageIntelligenceTrialDefaults.pb    TextInput
Resources                Versions

TextInputCore.framework:
Resources    TextInputCore    Versions

TextInputCore.framework.bak:
Resources    TextInputCore    Versions

TextInputMenuUI.framework:
Resources    TextInputMenuUI    Versions


 【移植のちょっと詳細】

【移植元作業】Mojave側

  1. ターミナルを開き、suでrootになる
  2. 上記の青文字のファイルを、cp -a でどこかのフォルダにまとめる
  3. zipで固めて、移植先マシンにコピーする

【移植先作業】Catalina側

  1. コピーされたzipを解凍し「何処かのフォルダ」に置く
  2. 移植先をインストールメディアで立ち上げる
  3. 移植先のフォルダで、mv hoge hoge.bakする
  4. 移植先フォルダに 「何処かのフォルダ」からcp -aする
  5. コピーしたファイルに対してchown -R root:whell hogeする
  6. 上記3.〜5.を対照ファイル分、繰り返す


【ご参考情報】

 macOS でよく見かける拡張属性や ACL

2020年8月8日土曜日

mongodb connector for business intelligence

 mongodb connector for business intelligence
って、mongodbをODBCぽいSQL-DBに見せかけるラッパーかな。

https://www.mongodb.com/products/bi-connector

https://docs.mongodb.com/bi-connector/master/


2020年8月7日金曜日

RP3B+のルートパーティションをnfsでマウント

絶不調のでお蔵入りにしていたRaspberry Pi 3B+だが、捨てるには惜しいので、不安定なμSDカードをできるだけ使わない方法で安定するかどうかを検証すべく、以下を行なった。

【USB経由でSDカードを使う】

  •  USB経由でSDカードを使うようにする
    /も/bootもSDカードのまま。ただし、sd→USBアダプタを使って起動させる。

何も設定しなくても、RP3B+は標準でUSBブートするようで、上記はあっさり動いた。


上記でも以前より安定して動いたような気がする。

しかし、もう一歩進めて、下記のようにした。


【USB経由で/bootさせ、/パーティションはnfsでマウントする】

  • USB経由のSDカードは、/bootだけにする(ほぼread onlyになる)
  • /ファイルシステムは、隣に並んでいるRaspberry Pi 4Bをnfsサーバにして、
    そこからのマウントにする
    (RP4Bのストレージは、USB3経由でマウントしているSSDなので
     SDカードよりは性能も耐久性も良いだろうと)
  •  具体的な方法はNFS Root on Raspberry Pi 4 そのままでいけた。
    (上記ページはraspbianの例もubuntuの例もあり、非常に助かる)

次にやるかもしれないのは、下記。

【PXEブートを使い、tftpで/bootをマウントさせ、/はnfsでマウント】

これができたら、不安定なSDから完全におさらばできる。

それらしい情報は下記にあるので、不安定さが解決しな時には試してみよう。

Raspberry Pi 3 でSDカードなしのネットワークブートをする

Network booting

以上(^^;


2020年8月3日月曜日

JSON形式のファイルと名乗るには

{ key: value }
というのが一つのObjectであり
{ key: value }
{ key: value }

というのは、複数のObjectを列記してあるに過ぎず、厳密にはJSONのObjectではない。

よって、上記のような形式のファイルは「JSONのようなもの」であるということになる。

厳密にJSON形式のファイルフォーマットというなら、
[
    { key: value }
    { key: value }
]
という配列(arrey)にする必要がありそうだ。

各種センサーのログを厳密にJSON形式のファイルフォーマットにするのは大変なので
「JSONのようなもの」のファイルにしておこう(^^;

2020年8月2日日曜日

Raspberry Pi 4B + BME280使用 温湿度・気圧センサモジュールキット

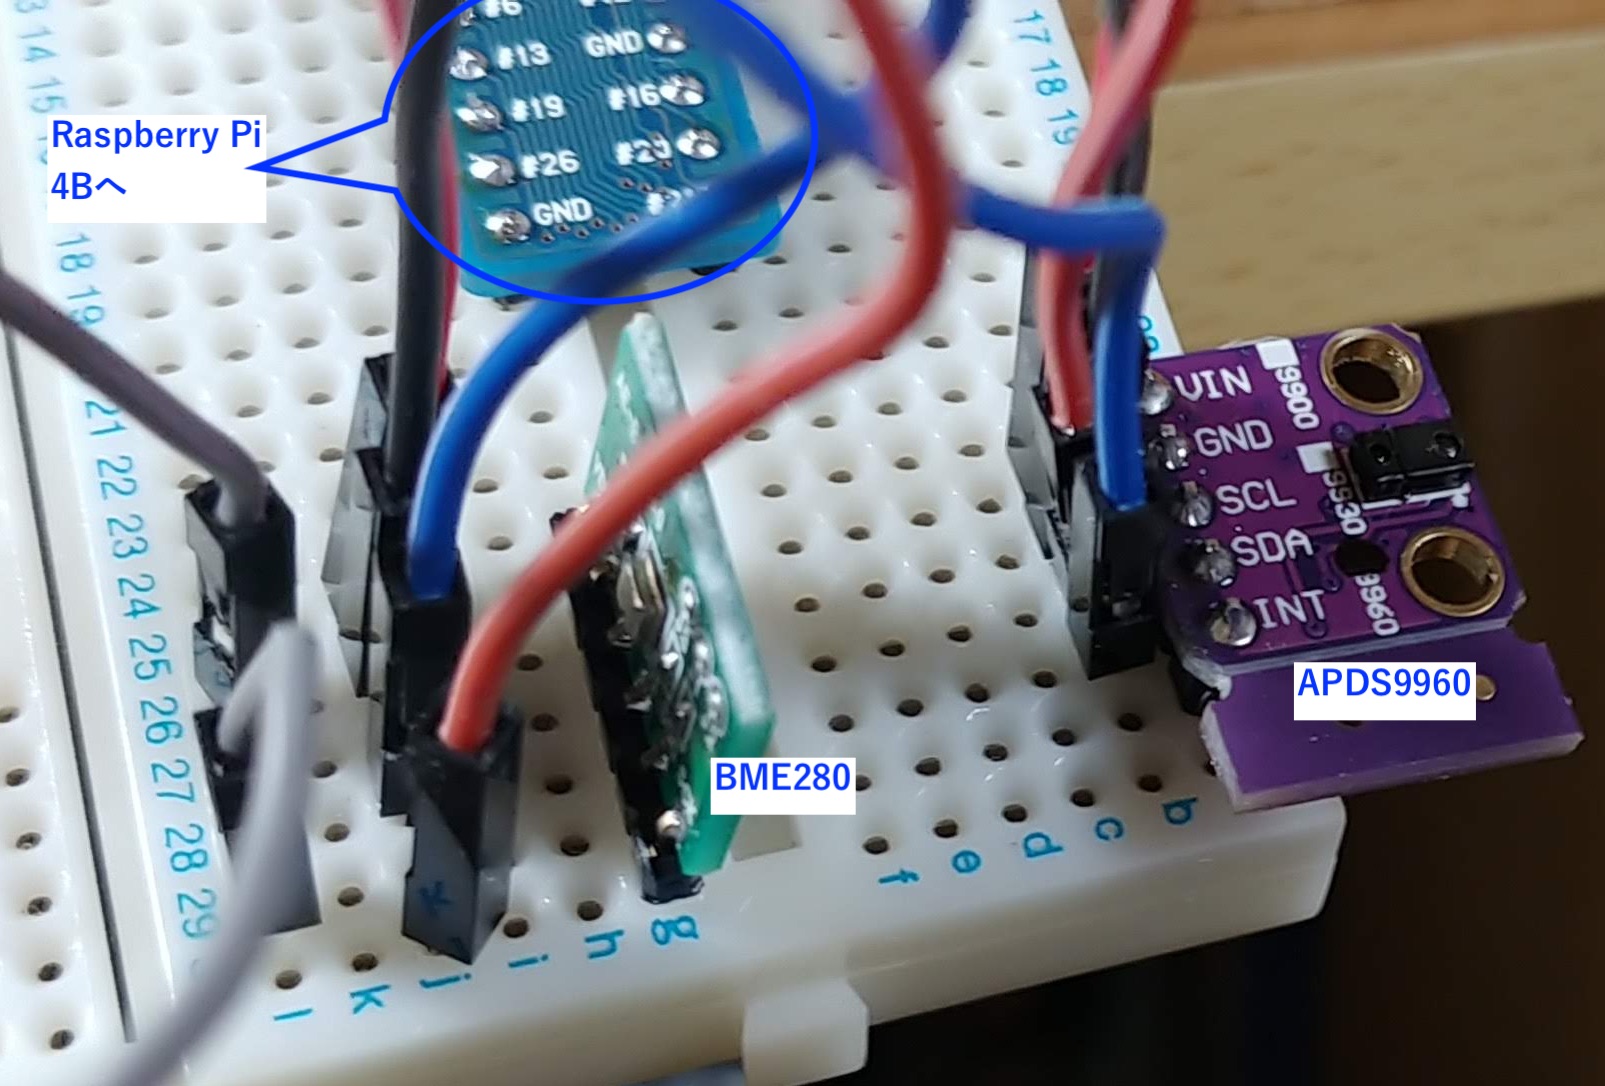
Raspberry Pi 4B + APDS9660使用光学式ジェスチャーセンサモジュールキット の続き。

【お品書き】

温度、湿度、大気圧のセンサが一つに入っているBME280のモジュールであるBME280使用 温湿度・気圧センサモジュールキットをi2cでラズパイに接続し、ログ取得するもの。

【準備】

スイッチサイエンスの販売サイトGithubの公開リポジトリ(Pythonスクリプトなど)へのリンクがあったので、それを利用することにした。

#python2向けだったので、少し手直しが必要だったけど。

【スクリプト】his.env2.py

[code]
#!/usr/bin/python3

#coding: utf-8

from smbus import SMBus
import datetime
import time

bus_number = 1
i2c_address = 0x76

bus = SMBus(bus_number)
path = '/sys/class/thermal/thermal_zone0/temp'

digT = []
digH = []
digP = []

t_fine = 0.0


def writeReg(reg_address, data):
    bus.write_byte_data(i2c_address, reg_address, data)


def get_calib_param():
    calib = []

    for i in range(0x88, 0x88 + 24):
        calib.append(bus.read_byte_data(i2c_address, i))
    calib.append(bus.read_byte_data(i2c_address, 0xA1))
    for i in range(0xE1, 0xE1 + 7):
        calib.append(bus.read_byte_data(i2c_address, i))

    digT.append((calib[1] << 8) | calib[0])
    digT.append((calib[3] << 8) | calib[2])
    digT.append((calib[5] << 8) | calib[4])
    digP.append((calib[7] << 8) | calib[6])
    digP.append((calib[9] << 8) | calib[8])
    digP.append((calib[11] << 8) | calib[10])
    digP.append((calib[13] << 8) | calib[12])
    digP.append((calib[15] << 8) | calib[14])
    digP.append((calib[17] << 8) | calib[16])
    digP.append((calib[19] << 8) | calib[18])
    digP.append((calib[21] << 8) | calib[20])
    digP.append((calib[23] << 8) | calib[22])
    digH.append(calib[24])
    digH.append((calib[26] << 8) | calib[25])
    digH.append(calib[27])
    digH.append((calib[28] << 4) | (0x0F & calib[29]))
    digH.append((calib[30] << 4) | ((calib[29] >> 4) & 0x0F))
    digH.append(calib[31])

    for i in range(1, 2):
        if digT[i] & 0x8000:
            digT[i] = (-digT[i] ^ 0xFFFF) + 1

    for i in range(1, 8):
        if digP[i] & 0x8000:
            digP[i] = (-digP[i] ^ 0xFFFF) + 1

    for i in range(0, 6):
        if digH[i] & 0x8000:
            digH[i] = (-digH[i] ^ 0xFFFF) + 1


def readData():
    data = []
    for i in range(0xF7, 0xF7 + 8):
        data.append(bus.read_byte_data(i2c_address, i))
    pres_raw = (data[0] << 12) | (data[1] << 4) | (data[2] >> 4)
    temp_raw = (data[3] << 12) | (data[4] << 4) | (data[5] >> 4)
    hum_raw = (data[6] << 8) | data[7]
    outstring = "{ \"place\": \"home\" ,"
    outstring += " \"time\": \"{}\" , ".format(
        datetime.datetime.utcnow().strftime("%Y-%m-%dT%H:%M:%SZ"))
    print(outstring, end="")
    with open(path) as f:
        tcpu = float(f.read()) / 1000.0
        print("\"cpu\": {:.1f} ,".format(tcpu), end='')
    compensate_T(temp_raw)
    compensate_H(hum_raw)
    compensate_P(pres_raw)


def compensate_P(adc_P):
    global t_fine

    v1 = (t_fine / 2.0) - 64000.0
    v2 = (((v1 / 4.0) * (v1 / 4.0)) / 2048) * digP[5]
    v2 = v2 + ((v1 * digP[4]) * 2.0)
    v2 = (v2 / 4.0) + (digP[3] * 65536.0)
    v1 = (((digP[2] * (((v1 / 4.0) * (v1 / 4.0)) / 8192)) / 8) +
          ((digP[1] * v1) / 2.0)) / 262144
    v1 = ((32768 + v1) * digP[0]) / 32768

    if v1 == 0:
        return 0
    pressure = ((1048576 - adc_P) - (v2 / 4096)) * 3125
    if pressure < 0x80000000:
        pressure = (pressure * 2.0) / v1
    else:
        pressure = (pressure / v1) * 2
    v1 = (digP[8] * (((pressure / 8.0) * (pressure / 8.0)) / 8192.0)) / 4096
    v2 = ((pressure / 4.0) * digP[7]) / 8192.0
    pressure = pressure + ((v1 + v2 + digP[6]) / 16.0)

    print(" \"pressure\": {:.1f} ".format(pressure / 100) + "}")

def compensate_T(adc_T):
    global t_fine
    v1 = (adc_T / 16384.0 - digT[0] / 1024.0) * digT[1]
    v2 = (adc_T / 131072.0 - digT[0] / 8192.0) * \
        (adc_T / 131072.0 - digT[0] / 8192.0) * digT[2]
    t_fine = v1 + v2
    temperature = t_fine / 5120.0
    print("\"temp\": {:.1f} ,".format(temperature), end='')


def compensate_H(adc_H):
    global t_fine
    var_h = t_fine - 76800.0
    if var_h != 0:
        var_h = (adc_H - (digH[3] * 64.0 + digH[4] / 16384.0 * var_h)) * (digH[1] / 65536.0 * (
            1.0 + digH[5] / 67108864.0 * var_h * (1.0 + digH[2] / 67108864.0 * var_h)))
    else:
        return 0
    var_h = var_h * (1.0 - digH[0] * var_h / 524288.0)
    if var_h > 100.0:
        var_h = 100.0
    elif var_h < 0.0:
        var_h = 0.0
    print(" \"humid\": {:.1f} ,".format(var_h), end='')


def setup():
    osrs_t = 1  # Temperature oversampling x 1
    osrs_p = 1  # Pressure oversampling x 1
    osrs_h = 1  # Humidity oversampling x 1
    mode = 3  # Normal mode
    t_sb = 5  # Tstandby 1000ms
    filter = 0  # Filter off
    spi3w_en = 0  # 3-wire SPI Disable

    ctrl_meas_reg = (osrs_t << 5) | (osrs_p << 2) | mode
    config_reg = (t_sb << 5) | (filter << 2) | spi3w_en
    ctrl_hum_reg = osrs_h

    writeReg(0xF2, ctrl_hum_reg)
    writeReg(0xF4, ctrl_meas_reg)
    writeReg(0xF5, config_reg)


setup()
get_calib_param()


if __name__ == '__main__':
    try:
        readData()
    except KeyboardInterrupt:
        pass

[/code]


【実行結果】
下記1行を標準出力に出して終わる。
{ place: "home" , time: "2020-08-02T12:33:42Z" , "cpu": 42.4 ,"temp": 33.2 , "humid": 56.7 , "pressure": 1013.9 }
 
【今後の予定】
  • crontabで10分ごとに動作させて、ファイルにためておく。
  • node.jsとmongoDBで作ったサービスに結果を登録し、Chart.jsなどでグラフ化する。

Raspberry Pi 4B + APDS9660使用光学式ジェスチャーセンサモジュールキット


【余談】
APDS9660をラズパイ上で動作させるので、スクリプトの方が何かと都合が良さそう。
Arduino用は秋月のサイトのサンプルプログラムはArduino用。

あちこち探して見つかったのは、Python用のライブラリであるhttps://github.com/liske/python-apds9960だった。
Pythonは書いたことがないのだが、まぁ仕方ない。

【ソフトウエアの準備】
# apt install python3-smbus python3-pip
# python3 -m pip install apds9960
# python3 -m pip install  RPi.GPIO

pipというパッケージマネージャで、ライブラリをインストールしてくれるのね。
便利だな。
jsのnpmと言い、pythonのpipと言い、あえてOSのパッケージマネージャと
別に用意するのは、今の流行というか、OS非依存にしてポータビリティを
上げる方針なんだろうな。

【スクリプト】his.ambient.py
https://github.com/liske/python-apds9960の中のテストスクリプトを元に、下記をでっち上げた。
[code]
#!/usr/bin/python3

from apds9960.const import *
from apds9960 import APDS9960
import RPi.GPIO as GPIO
import smbus
import datetime, time
from time import sleep

port = 1
bus = smbus.SMBus(port)

apds = APDS9960(bus)

def intH(channel):
    print()

GPIO.setmode(GPIO.BOARD)
GPIO.setup(7, GPIO.IN)
try:
    # Interrupt-Event hinzufuegen, steigende Flanke
    GPIO.add_event_detect(7, GPIO.FALLING, callback = intH)
    apds.enableLightSensor()
    sleep(1)
    outstring = "{ place : \"home\" ,"
    outstring += "  time : \"{}\" ,".format(datetime.datetime.utcnow().strftime(
"%Y-%m-%dT%H:%M:%SZ"))
    outstring += "  AmbientLight : {} ,".format(apds.readAmbientLight())
    outstring += "  red :{} ,".format(apds.readRedLight())
    outstring += "  green :{} ,".format(apds.readGreenLight())
    outstring += "  blue :{} ".format(apds.readBlueLight()) + "}"
    print(outstring)

finally:
    GPIO.cleanup()

[/code]
【実行結果】
下記1行を標準出力に出して終わる。
{ place : "home" ,  time : "2020-08-02T11:58:17Z" ,  "AmbientLight" : 151 ,  "red" :33 ,  "green" :28 ,  "blue" :26 }
【今後の予定】
  • crontabで10分ごとに動作させて、ファイルにためておく。
  • node.jsとmongoDBで作ったサービスに結果を登録し、Chart.jsなどでグラフ化する。
  • もともとAPDS9660はジェスチャーセンサーなんだが、その機能は使う予定なし。


Raspberry Pi 4B のi2cバスにセンサーを接続

【お品書き】
Rapberry pi 4Bのi2cにバス繋いでみた。
#正確には、APDS9660モジュールは秋月のものではなく、同等品。
【接続】
ラズパイ4Bは、放熱のためにアルミ合金ケースに入れているが、GPIO(40pin)はフラットケーブルでケース外に引き出すことができる。
そこからブレッドボードに繋いでセンサーモジュールを接続してみた。


【接続確認】
# apt install i2c-tools
# i2cdetect -y 1
     0  1  2  3  4  5  6  7  8  9  a  b  c  d  e  f
00:          -- -- -- -- -- -- -- -- -- -- -- -- --
10: -- -- -- -- -- -- -- -- -- -- -- -- -- -- -- --
20: -- -- -- -- -- -- -- -- -- -- -- -- -- -- -- --
30: -- -- -- -- -- -- -- -- -- 39 -- -- -- -- -- --
40: -- -- -- -- -- -- -- -- -- -- -- -- -- -- -- --
50: -- -- -- -- -- -- -- -- -- -- -- -- -- -- -- --
60: -- -- -- -- -- -- -- -- -- -- -- -- -- -- -- --
70: -- -- -- -- -- -- 76 --              
  • 0x39がAPDS9660
  • 0x76がBME280
とりあえず、認識されているようだ。

ソフトウエアの設定については、別途。


2020年8月1日土曜日

サーバサイドの準備 その1

【準備段階のメモ】
  1. raspberry Pi 4B(8GB)にSSD(500GB)をUSB3.0で接続し、
  2. そこにubuntu 20.04 LTSをインストール。
  3. node.js、express、nodemon、vue.js、chart.jsをインストール。
  4. さらに、npm install -g d3でd3をインストール。
  5. ubuntuのパッケージからではなく、mongodb-orgをインストール。
  6. 追加でnpm install -g mongoose
vue.jsはスマホなどからアクセスする時のGUI用。
chart.jsはグラフ表示用。
d3.jsもグラフ表示だけど、先は長そう。


2020年7月30日木曜日

M5Stack COCOA Counter + ENV.2 Sensor + GPS Unit のログファイルをHTTP POSTするスケッチ その1

【主な機能】

【付加機能】
  • ボタンA(左)を押すと、M5Stack-SD-Updaterに遷移する。
  • 読み出すログファイル名、接続するWiFiのSSID/pass、http POSTするURLを
    マイクロSD内の"/GPSlog.conf"という名の初期設定ファイルから読み出すようにした。
    (使用環境に合わせるためのスケッチの修正やリコンパイルを不要にした。)

【かっこ悪いところ】
  • ログファイル内のJSONのフォーマットチェックを一切おこなっていない。
  • http POSTが失敗した時のエラー処理を一切おこなっていない。
  • 何レコードをPOSTしたのかもカウントしていない。

【初期設定ファイル例】
{
    logfile: "/GPSlog.jsn",
    buf: 2048,
    ssid: "secret-SSID-home2.4",
    pass: "secret-password-home",
    url: "http://192.168.0.112:3000/log"
}

【初期設定ファイルの説明】
logfile: ログファイル名
buf: 1レコードのJSON文字列用のバッファ長
ssid: 接続するWiFiのSSID
pass: WiFiのパスワード
url: httpでPOSTするURL   
【スケッチ・ソース】his.GPS.LOG.POST.ino
[code]
// M5Stack ----------------------------------------------------------------
#include <M5Stack.h>
#include "M5StackUpdater.h"
// HTTP -------------------------------------------------------------------
#include <HTTPClient.h>
// JSON -------------------------------------------------------------------
#include <ArduinoJson.h>
// SD ---------------------------------------------------------------------
#include <SPI.h>
#include <SD.h>
// WiFi -------------------------------------------------------------------
#include <WiFi.h>

// CONFIG -----------------------------------------------------------------
struct Config {
  char logfile[12];
  int  buf;
  char ssid[64];
  char pass[64];
  char url[256];
};

Config config;

const char *cnfFileName = "/GPSlog.cnf"; //環境毎に設定

File logFile;

void loadConfiguration(const char *filename, Config &config) {
  File file = SD.open(cnfFileName);
  StaticJsonDocument<512> doc;

  // Deserialize the JSON document
  DeserializationError error = deserializeJson(doc, file);
  if (error)
    Serial.println(F("ERROR while reading config file. using default conf"));

  // Copy values from the JsonDocument to the Config
  strlcpy(config.logfile,
          doc["logfile"] | "/GPSlog.jsn",  //環境毎に設定
          sizeof(config.logfile));
  Serial.println("log file name: " + String(config.logfile));
  config.buf = doc["buf"] | 1024;         //環境毎に設定
  Serial.println("JSON line buffer size: " + String(config.buf));
  strlcpy(config.ssid,
          doc["ssid"] | "SSID-open",  //環境毎に設定
          sizeof(config.ssid));
  Serial.println("SSID: " + String(config.ssid));
  strlcpy(config.pass,
          doc["pass"] | "passowrd",  //環境毎に設定
          sizeof(config.pass));
  Serial.println("pass: " + String(config.pass));
  strlcpy(config.url,
          doc["url"] | "http://example.com:3000/postjson",  //環境毎に設定
          sizeof(config.url));
  Serial.println("http POST url: " + String(config.url));

  // Close the file (Curiously, File's destructor doesn't close the file)
  file.close();
}
// HTTP -------------------------------------------------------------------
bool dohttpPOST(String logstring)
{
  bool b = false;
  HTTPClient http;
  http.begin(config.url);
  http.addHeader("Content-Type", "application/json");
  int status_code = http.POST(logstring);
  Serial.printf("status_code=%d\r\n", status_code);
  if (status_code == 200) {
    String json_response = http.getString();
    Serial.println("respose->"); Serial.println(json_response);
    b = true;
  }
  http.end();
  return b;
}
// WiFi -------------------------------------------------------------------
void connectWiFi() {
  WiFi.mode(WIFI_STA);  //STAモード(子機)として使用
  WiFi.disconnect();    //Wi-Fi切断

  WiFi.begin(config.ssid , config.pass); //環境毎に設定
  while (WiFi.status() != WL_CONNECTED) {
    Serial.println("trying WiFi Connection...");
    delay(1000);
  }
  Serial.println("WiFi Connected.");
}

// Inside -----------------------------------------------------------------
void setup() {
  M5.begin();
  M5.Power.begin();
  M5.Lcd.println("Hello!, JSON http.post");

  Serial.begin(115200);
  loadConfiguration(cnfFileName, config);

  //SD -------------------------------------------
  logFile = SD.open(String(config.logfile));
  if (logFile) {
    Serial.println("log file found");
  } else {
    Serial.println("error: opening " + String(config.logfile));
  }

  //WiFI -------------------------------------------
  connectWiFi();

  //HTTP -------------------------------------------
  int pt = 0;
  char readbuf[config.buf] = "";
  while (logFile.available()) {
    readbuf[pt] = logFile.read();
    if (readbuf[pt] == 0x0A) {
      readbuf[pt + 1] = 0;
      String s = readbuf;
      Serial.println("String length=" + String(s.length()));
      Serial.println(s);
      if (dohttpPOST(s)) {
        Serial.println("post OK");
      } else {
        Serial.println("post ERROR");
      }
      pt = 0;
      char readbuf[config.buf] = "";
      delay(50);
    } else {
      pt++;
    }
  }
}

void loop() {
  M5.update();
  M5.Lcd.setTextSize(3);
  M5.Lcd.println();
  M5.Lcd.setTextColor(BLUE, WHITE);
  M5.Lcd.println("log file http.POST done.");
  M5.Lcd.println("A: SDUpdater");
  while (1) {
    if (M5.BtnA.wasReleased()) { //AボタンでSDUpdater
      updateFromFS(SD);
      ESP.restart();
    }
    delay(100);
    M5.update(); // update button state
  }
}
// Arranged and written by 柴田(ひ)
[/code]


M5Stack COCOA Counter + ENV.2 Sensor + GPS Unit その4


【変更内容】
  • 出力ファイル名の変更
    →マイクロSDカードに"GPSlog.jsn"というファイル名で
     JSONフォーマットのログを出力する。


【既知のバグ】
  • GPSからの取得データ値がおかしなことがある。
    →あれこれ調べたけど、断念(^^;

【今後の予定】
  • JSON形式のログをhttp POSTで
    node.js+express+mongoDBで構築している
    ログ収集サーバにuploadするスケッチを作成する。
    →一応できたので、別に書いときます。

  • コテコテコーディングからArduino_JSONを利用するように書き直し。
    →変更してない。
     http POSTするスケッチの中でちょっとだけ使用。


  • ログ収集サーバ側では、JSON→GPX変換して、
    googleMap等に表示できるようにする。
    →まだ未着手。

  • 同じくサーバサイドで、グラフ表示などの機能を作る。
    生成したグラフは、Blogger上のこのブログに自動投稿させる。
    →同じく未着手。

【出力ファイル内の例】
{ "class": "TPV" ,"mode": 3 ,"time": "2020-07-30T06:41:13Z" ,"lat": 35.123456 ,"lon": 139.123456 ,"alt": 26.5 ,"track": 185.950000 ,"speed": 0.0 ,"ble": 15 ,"cocoa": 4 ,"temp": 27.4 ,"humidity": 70.0 ,"pressure": 1015.5 }
{ "class": "TPV" ,"mode": 3 ,"time": "2020-07-30T06:41:24Z" ,"lat": 35.123456 ,"lon": 139.123456 ,"alt": 25.2 ,"track": 185.950000 ,"speed": 0.0 ,"ble": 16 ,"cocoa": 5 ,"temp": 27.4 ,"humidity": 70.0 ,"pressure": 1015.5 }
{ "class": "TPV" ,"mode": 3 ,"time": "2020-07-30T06:41:34Z" ,"lat": 35.123456 ,"lon": 139.123456 ,"alt": 25.3 ,"track": 185.950000 ,"speed": 0.0 ,"ble": 15 ,"cocoa": 6 ,"temp": 27.4 ,"humidity": 70.0 ,"pressure": 1015.5 }


【スケッチ・ソース】his.GPS.LOG.SAVE.ino
[code]
// M5Stack ----------------------------------------------------------------
#include <M5Stack.h>
#include "M5StackUpdater.h"
// BLE & Cocoa ------------------------------------------------------------
#include <BLEDevice.h>
// ENV2 -------------------------------------------------------------------
/* add library Adafruit_BMP280 & Adafruit_SHT31 from library manage */
#include <Adafruit_Sensor.h>
#include <Adafruit_SHT31.h>
#include <Wire.h> //The SHT31 uses I2C comunication.
#include <Adafruit_BMP280.h>
// GPS --------------------------------------------------------------------
#include <TinyGPS++.h>
// SD ---------------------------------------------------------------------
#include <SPI.h>
#include <SD.h>
// BLE & Cocoa ------------------------------------------------------------
int scanTime = 5;
BLEScan* pBLEScan;
const int chipSelect = 4;
bool onBeep = true;

//接触確認アプリのUUID
const char* cocoaUUID = "0000fd6f-0000-1000-8000-00805f9b34fb";
int cocoaCnt = 0; //time out in seconds

class MyAdvertisedDeviceCallbacks: public BLEAdvertisedDeviceCallbacks {
    void onResult(BLEAdvertisedDevice advertisedDevice) {
      if (advertisedDevice.haveServiceUUID()) {
        if (strncmp(advertisedDevice.getServiceUUID().toString().c_str(), cocoaUUID, 36) == 0) {
          cocoaCnt++;
          if (onBeep) {
            M5.Speaker.beep();
            delay(10);
            M5.Speaker.mute();
          }
          M5.Lcd.setCursor(0, 110);
          M5.Lcd.setTextSize(2);
          M5.Lcd.setTextColor(GREEN, BLACK);
          M5.Lcd.printf("%d ", cocoaCnt);
          M5.Lcd.setTextSize(1);
        }
      }
      M5.Lcd.println(advertisedDevice.toString().c_str());
      M5.Lcd.setTextSize(1);
      M5.Lcd.setTextColor(WHITE, BLACK);
    }
};

void setupBLE() {
  BLEDevice::init("");
  pBLEScan = BLEDevice::getScan(); //create new scan
  pBLEScan->setAdvertisedDeviceCallbacks(new MyAdvertisedDeviceCallbacks());
  pBLEScan->setActiveScan(true); //active scan uses more power, but get results faster
  pBLEScan->setInterval(100);
  pBLEScan->setWindow(99);  // less or equal setInterval value
}
// ENV2 -------------------------------------------------------------------
Adafruit_SHT31 sht31 = Adafruit_SHT31();
Adafruit_BMP280 bme;

bool hasSHT31 = false;
bool hasBMP280 = false;
float tmp = 100;
float hum = 0;
float pressure = 0;

void setupENV2() {
  //ENV2 sensor on I2C setup
  Wire.begin();
  Serial.println(F("ENV.2 Chk"));

  if (sht31.begin(0x44)) {   // Set to 0x45 for alternate i2c addr
    hasSHT31 = true;
    Serial.println("SHT31 Ok");

    Serial.print("Heater: ");
    if (sht31.isHeaterEnabled())
      Serial.println("Ena");
    else
      Serial.println("Dis");
  }

  if (bme.begin(0x76)) {
    hasBMP280 = true;
    Serial.println("BMP280 Ok");
  }
}
// GPS --------------------------------------------------------------------
//bool hasRTC = false;
bool hasGPS = false;
TinyGPSPlus gps; // The TinyGPS++ object
HardwareSerial hsGps(2);// The serial connection to the GPS device
static const uint32_t GPSBaud = 9600;

void setupGPS() {
  hsGps.begin(GPSBaud);
  delay(500);

  if (hsGps.available() > 0) {
    hasGPS = true;
    Serial.println("GPS Ok");
  }
}
// SD ---------------------------------------------------------------------
// log file name
const char* logfile = "/GPSlog.jsn";
// Inside -----------------------------------------------------------------
unsigned char bright = 0x03;
unsigned char brightPitch = 0x10;
//文字列
const char* logJSON = "{ \"class\": \"TPV\" ,\
\"mode\": 3 ,\
\"time\": \"%d-%02d-%02dT%02d:%02d:%02dZ\" ,\
\"lat\": %lf ,\
\"lon\": %lf ,\
\"alt\": %.1f ,\
\"track\": %lf ,\
\"speed\": %.1f ,\
\"ble\": %d ,\
\"cocoa\": %d ,\
\"temp\": %.1f ,\
\"humidity\": %.1f ,\
\"pressure\": %.1f }
";

// ------------------------------------------------------------------------
void setup() {

  // Initialize the M5Stack
  M5.begin();
  M5.Power.begin();
  M5.Lcd.setBrightness(bright);
  M5.Lcd.setTextSize(1);
  M5.Lcd.println("Hello!, COCOA Scan");

  Serial.begin(115200);

  setupBLE();
  setupENV2();
  setupGPS();

  if (digitalRead(BUTTON_A_PIN) == 0) {
    Serial.println("Will Load menu binary");
    updateFromFS(SD);
    ESP.restart();
  }

}

void loop() {
  // print all found BLE devices
  M5.Lcd.setTextSize(1);

  BLEScanResults foundDevices = pBLEScan->start(scanTime, false);

  // print counts of BLE devices
  int sumdev = foundDevices.getCount();

  // print env2 data
  if (hasSHT31) {
    tmp = sht31.readTemperature();
    hum = sht31.readHumidity();
  }
  if (hasBMP280) {
    pressure = bme.readPressure() / 100;
    // hPa = Pa / 100;
  }

  while (hsGps.available() > 0) {
    gps.encode(hsGps.read());
  }

  Serial.printf(logJSON, gps.date.year(), gps.date.month(), gps.date.day(),
                gps.time.hour(), gps.time.minute(), gps.time.second(),
                gps.location.lat(), gps.location.lng(), gps.altitude.meters(), gps.course.deg(),
                gps.speed.mps(), sumdev, cocoaCnt, tmp, hum, pressure);
  Serial.println();

  // SDカードへの書き込み処理(ファイル追加モード)
  // SD.beginはM5.begin内で処理されているので不要
  // open the file. note that only one file can be open at a time,
  // so you have to close this one before opening another.
  File dfile = SD.open(logfile, FILE_APPEND);

  // if the file is available, write to it:
  if (dfile) {
    dfile.printf(logJSON, gps.date.year(), gps.date.month(), gps.date.day(),
                 gps.time.hour(), gps.time.minute(), gps.time.second(),
                 gps.location.lat(), gps.location.lng(), gps.altitude.meters(), gps.course.deg(),
                 gps.speed.mps(), sumdev, cocoaCnt, tmp, hum, pressure);
    dfile.println();
  }

  // clear screen and set cursor to the top
  M5.Lcd.fillScreen(BLACK);
  M5.Lcd.setCursor(0, 0);
  M5.Lcd.setTextSize(2);
  M5.Lcd.setTextColor(WHITE, BLACK);
  M5.Lcd.printf(logJSON, gps.date.year(), gps.date.month(), gps.date.day(),
                gps.time.hour(), gps.time.minute(), gps.time.second(),
                gps.location.lat(), gps.location.lng(), gps.altitude.meters(), gps.course.deg(),
                gps.speed.mps(), sumdev, cocoaCnt, tmp, hum, pressure);
  M5.Lcd.println();

  //Button controll
  M5.Lcd.setTextSize(3);
  M5.Lcd.println();
  M5.Lcd.setTextColor(BLUE, WHITE);
  M5.Lcd.println("A: SDUpdater");
  M5.Lcd.println("B: Beep on/off");
  M5.Lcd.println("C: Brightness");

  int timer = 100;
  while (timer--) {
    if (M5.BtnA.wasReleased()) { //AボタンでSDUpdater
      updateFromFS(SD);
      ESP.restart();
    } else if (M5.BtnB.wasReleased()) { //Bボタンでbeepをon/off切り替える
      onBeep = !onBeep;
    } else if (M5.BtnC.wasReleased()) { //Cボタンで輝度を変更
      bright += brightPitch;
      M5.Lcd.setBrightness(bright);
    }
    delay(50);
    M5.update(); // update button state
  }

  //init for next loop
  dfile.close();
  pBLEScan->clearResults();   // delete results fromBLEScan buffer to release memory
  cocoaCnt = 0;

  M5.Lcd.setTextColor(WHITE, BLACK);
  M5.Lcd.setCursor(0, 110);
  M5.Lcd.setTextSize(1);
}

// Arranged and written by 柴田(ひ)
/* BLE
   Based on Neil Kolban example for IDF: https://github.com/nkolban/esp32-snippets/blob/master/cpp_utils/tests/BLE%20Tests/SampleScan.cpp
   Ported to Arduino ESP32 by Evandro Copercini
*/
/* Cocoa
   Thanks to https://gist.github.com/ksasao/0da6437d3eac9b2dbd675b6fee5d1117
   by https://gist.github.com/ksasao
*/
/* GPS
   This sample sketch demonstrates the normal use of a TinyGPS++ (TinyGPSPlus) object.
   by Mikal Hart
*/
/* SD
   SD card wrie routine
   https://raspberrypi.mongonta.com/howto-write-csv-to-sdcard-on-m5stack/
*/
[/code]

2020年7月26日日曜日

gpsd_jsonをもとにnode.js+mongoose用のスキーマ

【メモ】
M5StackにGPS Unitをつけて、各種ログをJSON形式で保存・データ連携することを試作中だが、「はて、どんなKeyにするのが適切かな?」と思ったのであちこち調べて見た。

なかなか良い情報が見つからなかったが、ここ↓の情報を元にすることにした。

上記に加えて、
  • 温度
  • 湿度
  • 気圧
などの情報を表すJSONのスキーマを自分のために記録しておく。

【コード】
[code]
//
//  https://gpsd.gitlab.io/gpsd/gpsd_json.html
//

const mongoose = require('mongoose');

// gpsd TPV format
const GpsSchema = mongoose.Schema({
  class: String,
  tag: String,
  device: String,
  mode: Number,
  time: String,
  ept: Number,
  lat: Number,
  lon: Number,
  alt: Number,
  epx: Number,
  epy: Number,
  epv: Number,
  track: Number,
  speed: Number,
  climb: Number,
  epd: Number,
  eps: Number,
  epc: Number,
  ble: Number,
  cocoa: Number,
  temp: Number,
  humid: Number,
  press: Number

});

module.exports = mongoose.model('Gps',GpsSchema);
[/code]


M5Stack COCOA Counter + ENV.2 Sensor + GPS Unit その3


【変更内容】
  • 出力ファイルをJSON形式に変更
  • M5Stack-SD-Updaterに適当に対応(^^;
  • 上記に伴いボタン割り当て変更
  • setup()内の各初期化処理をサブルーチン化
【既知のバグ】
  • GPSからの取得データ値がおかしなことがある。
    具体的には、timeが更新されないことがある。
    シリアル経由での読み込みルーチンの見直しが必要のようだが、
    後回しにしている(^^;
【今後の予定】
  • 現在決めうちにしているログファイル名を
    log-YYYYMMDD.txtに変更する。

  • JSON形式のログをhttp POSTで
    node.js+express+mongoDBで構築している
    ログ収集サーバにuploadするスケッチを作成する。

    #そのために、M5Stack-SD-Updaterに対応したようなもの。
    #尚、一つのスケッチでやろうとしたが、サイズオーバで入らなかった(^^;

  • コテコテコーディングからArduino_JSONを利用するように書き直し。

  • ログ収集サーバ側では、JSON→GPX変換して、
    googleMap等に表示できるようにする。

  • 同じくサーバサイドで、グラフ表示などの機能を作る。
    生成したグラフは、Blogger上のこのブログに自動投稿させる。

【ソース】

[code]
// M5Stack ----------------------------------------------------------------
#include <M5Stack.h>
#include "M5StackUpdater.h"
// BLE & Cocoa ------------------------------------------------------------
#include <BLEDevice.h>
// ENV2 -------------------------------------------------------------------
/* add library Adafruit_BMP280 & Adafruit_SHT31 from library manage */
#include <Adafruit_Sensor.h>
#include <Adafruit_SHT31.h>
#include <Wire.h> //The SHT31 uses I2C comunication.
#include <Adafruit_BMP280.h>
// GPS --------------------------------------------------------------------
#include <TinyGPS++.h>
// SD ---------------------------------------------------------------------
#include <SPI.h>
#include <SD.h>
// BLE & Cocoa ------------------------------------------------------------
int scanTime = 5;
BLEScan* pBLEScan;
const int chipSelect = 4;
bool onBeep = true;

//接触確認アプリのUUID
const char* cocoaUUID = "0000fd6f-0000-1000-8000-00805f9b34fb";
int cocoaCnt = 0; //time out in seconds

class MyAdvertisedDeviceCallbacks: public BLEAdvertisedDeviceCallbacks {
    void onResult(BLEAdvertisedDevice advertisedDevice) {
      if (advertisedDevice.haveServiceUUID()) {
        if (strncmp(advertisedDevice.getServiceUUID().toString().c_str(), cocoaUUID, 36) == 0) {
          cocoaCnt++;
          if (onBeep) {
            M5.Speaker.beep();
            delay(10);
            M5.Speaker.mute();
          }
          M5.Lcd.setCursor(0, 110);
          M5.Lcd.setTextSize(2);
          M5.Lcd.setTextColor(GREEN, BLACK);
          M5.Lcd.printf("%d ", cocoaCnt);
          M5.Lcd.setTextSize(1);
        }
      }
      M5.Lcd.println(advertisedDevice.toString().c_str());
      M5.Lcd.setTextSize(1);
      M5.Lcd.setTextColor(WHITE, BLACK);
    }
};

void setupBLE() {
  BLEDevice::init("");
  pBLEScan = BLEDevice::getScan(); //create new scan
  pBLEScan->setAdvertisedDeviceCallbacks(new MyAdvertisedDeviceCallbacks());
  pBLEScan->setActiveScan(true); //active scan uses more power, but get results faster
  pBLEScan->setInterval(100);
  pBLEScan->setWindow(99);  // less or equal setInterval value
}
// ENV2 -------------------------------------------------------------------
Adafruit_SHT31 sht31 = Adafruit_SHT31();
Adafruit_BMP280 bme;

bool hasSHT31 = false;
bool hasBMP280 = false;
float tmp = 100;
float hum = 0;
float pressure = 0;

void setupENV2() {
  //ENV2 sensor on I2C setup
  Wire.begin();
  Serial.println(F("ENV.2 Chk"));

  if (sht31.begin(0x44)) {   // Set to 0x45 for alternate i2c addr
    hasSHT31 = true;
    Serial.println("SHT31 Ok");

    Serial.print("Heater: ");
    if (sht31.isHeaterEnabled())
      Serial.println("Ena");
    else
      Serial.println("Dis");
  }

  if (bme.begin(0x76)) {
    hasBMP280 = true;
    Serial.println("BMP280 Ok");
  }
}
// GPS --------------------------------------------------------------------
//bool hasRTC = false;
bool hasGPS = false;
TinyGPSPlus gps; // The TinyGPS++ object
HardwareSerial hsGps(2);// The serial connection to the GPS device
static const uint32_t GPSBaud = 9600;

void setupGPS() {
  hsGps.begin(GPSBaud);
  delay(500);

  if (hsGps.available() > 0) {
    hasGPS = true;
    Serial.println("GPS Ok");
  }
}
// SD ---------------------------------------------------------------------
// log file name
const char* logfile = "/logJSON.txt";
// Inside -----------------------------------------------------------------
unsigned char bright = 0x03;
unsigned char brightPitch = 0x10;
//文字列
const char* logJSON = "{ \"class\": \"TPV\" ,\
\"mode\": 3 ,\
\"time\": \"%d-%02d-%02dT%02d:%02d:%02dZ\" ,\
\"lat\": %lf ,\
\"lon\": %lf ,\
\"alt\": %.1f ,\
\"track\": %lf ,\
\"speed\": %.1f ,\
\"ble\": %d ,\
\"cocoa\": %d ,\
\"temp\": %.1f ,\
\"humidity\": %.1f ,\
\"pressure\": %.1f }";

// ------------------------------------------------------------------------
void setup() {

  // Initialize the M5Stack
  M5.begin();
  M5.Power.begin();
  M5.Lcd.setBrightness(bright);
  M5.Lcd.setTextSize(1);
  M5.Lcd.println("Hello!, COCOA Scan");

  Serial.begin(115200);

  setupBLE();
  setupENV2();
  setupGPS();

  if (digitalRead(BUTTON_A_PIN) == 0) {
    Serial.println("Will Load menu binary");
    updateFromFS(SD);
    ESP.restart();
  }

}

void loop() {
  // print all found BLE devices
  M5.Lcd.setTextSize(1);

  BLEScanResults foundDevices = pBLEScan->start(scanTime, false);

  // print counts of BLE devices
  int sumdev = foundDevices.getCount();

  // print env2 data
  if (hasSHT31) {
    tmp = sht31.readTemperature();
    hum = sht31.readHumidity();
  }
  if (hasBMP280) {
    pressure = bme.readPressure() / 100;
    // hPa = Pa / 100;
  }

  while (hsGps.available() > 0) {
    gps.encode(hsGps.read());
  }

  Serial.printf(logJSON, gps.date.year(), gps.date.month(), gps.date.day(),
                gps.time.hour(), gps.time.minute(), gps.time.second(),
                gps.location.lat(), gps.location.lng(), gps.altitude.meters(), gps.course.deg(),
                gps.speed.mps(), sumdev, cocoaCnt, tmp, hum, pressure);
  Serial.println();

  // SDカードへの書き込み処理(ファイル追加モード)
  // SD.beginはM5.begin内で処理されているので不要
  // open the file. note that only one file can be open at a time,
  // so you have to close this one before opening another.
  File dfile = SD.open(logfile, FILE_APPEND);

  // if the file is available, write to it:
  if (dfile) {
    dfile.printf(logJSON, gps.date.year(), gps.date.month(), gps.date.day(),
                 gps.time.hour(), gps.time.minute(), gps.time.second(),
                 gps.location.lat(), gps.location.lng(), gps.altitude.meters(), gps.course.deg(),
                 gps.speed.mps(), sumdev, cocoaCnt, tmp, hum, pressure);
    dfile.println();
  }

  // clear screen and set cursor to the top
  M5.Lcd.fillScreen(BLACK);
  M5.Lcd.setCursor(0, 0);
  M5.Lcd.setTextSize(2);
  M5.Lcd.setTextColor(WHITE, BLACK);
  M5.Lcd.printf(logJSON, gps.date.year(), gps.date.month(), gps.date.day(),
                gps.time.hour(), gps.time.minute(), gps.time.second(),
                gps.location.lat(), gps.location.lng(), gps.altitude.meters(), gps.course.deg(),
                gps.speed.mps(), sumdev, cocoaCnt, tmp, hum, pressure);
  M5.Lcd.println();

  //Button controll
  M5.Lcd.setTextSize(3);
  M5.Lcd.println();
  M5.Lcd.setTextColor(BLUE, WHITE);
  M5.Lcd.println("A: SDUpdater");
  M5.Lcd.println("B: Beep on/off");
  M5.Lcd.println("C: Brightness");

  int timer = 100;
  while (timer--) {
    if (M5.BtnA.wasReleased()) { //AボタンでSDUpdater
      updateFromFS(SD);
      ESP.restart();
    } else if (M5.BtnB.wasReleased()) { //Bボタンでbeepをon/off切り替える
      onBeep = !onBeep;
    } else if (M5.BtnC.wasReleased()) { //Cボタンで輝度を変更
      bright += brightPitch;
      M5.Lcd.setBrightness(bright);
    }
    delay(50);
    M5.update(); // update button state
  }

  //init for next loop
  dfile.close();
  pBLEScan->clearResults();   // delete results fromBLEScan buffer to release memory
  cocoaCnt = 0;

  M5.Lcd.setTextColor(WHITE, BLACK);
  M5.Lcd.setCursor(0, 110);
  M5.Lcd.setTextSize(1);
}

// Arranged and written by 柴田(ひ)
/* BLE
   Based on Neil Kolban example for IDF: https://github.com/nkolban/esp32-snippets/blob/master/cpp_utils/tests/BLE%20Tests/SampleScan.cpp
   Ported to Arduino ESP32 by Evandro Copercini
*/
/* Cocoa
   Thanks to https://gist.github.com/ksasao/0da6437d3eac9b2dbd675b6fee5d1117
   by https://gist.github.com/ksasao
*/
/* GPS
   This sample sketch demonstrates the normal use of a TinyGPS++ (TinyGPSPlus) object.
   by Mikal Hart
*/
/* SD
   SD card wrie routine
   https://raspberrypi.mongonta.com/howto-write-csv-to-sdcard-on-m5stack/
*/
[/code]

2020年7月25日土曜日

node.jp + express + mongoDB関連のインストール

node.jp と express のインストール

下記ページがかなり参考になったけど、肝心の「最終結果のjsソース」が書かれてないので、やっぱりハマった。


mongoDBをubuntuにインストール

ここが本家なのか?ということも知らないが(^^;

n コマンドの出力結果
  ο node/12.18.3

Use up/down arrow keys to select a version, return key to install, d to delete, q to quit

npm list -g コマンドの出力結果
ちょっと多すぎるので省略
とりあえず、expressを入れとけば、body-parserは入れなくて良いようだ。


node.jp + express + mongoDB 作業メモ

  1. インストールしたPATH
    /var/www/node/express_mongodb

  2. 起動コマンド
    npx nodemon app.js

  3. app.js
const express = require('express');
const app = express();
const mongoose = require('mongoose');
const userRouter = require('./routes/user');

app.use('/user', userRouter);
//app.use(express.json());

const port = 3000;

const options = {
    useUnifiedTopology : true,
    useNewUrlParser : true
}

mongoose.connect('mongodb://127.0.0.1/test_db',options);

const db = mongoose.connection;

db.on('error', console.error.bind(console, 'connection error:'));
db.once('open', () => console.log('Database connection successful'));
app.get('/', (req, res) =>
    res.sendFile('/var/www/node/express_mongodb/test.html'))

app.listen(port,
    () => console.log(`Example app listening on port ${port}!`));
 
  1. models/User.js
    const mongoose = require('mongoose');

    const UserSchema = mongoose.Schema({
      name: String,
      age: Number
    });

    module.exports = mongoose.model('User',UserSchema);
     
  2. routes/user.js
    const express = require('express');

    const router = express.Router();
    const User = require('../models/User');

    router.use(express.json());
    router.use(express.urlencoded({ extended: false }));

    router.get('/', async (req, res) => {
        const users = await User.find({});
        res.json(users);
    });

    router.get('/:userID',(req, res)=>{
        User.findById(req.params.userID,(err,user)=>{
            if (err) console.log('error');
            res.send(user);
        });
    });

    router.post('/', async (req,res)=>{
        console.log(req.body);

        const user = new User({
            name: req.body.name,
            age: req.body.age
        });

        const savedUser = await user.save();
        res.json(savedUser);

    });

    router.delete('/:userID',async (req,res)=>{
        const user = await User.remove({_id: req.params.userID});
        res.send(user);
    });

    router.patch('/:userID',async (req,res)=>{
        console.log(req.body.age);
        const user = await User.updateOne({_id: req.params.userID},{$set:{age:re
    q.body.age}});
        res.send(user);
    });

    module.exports = router;

  3. test.html
    <!DOCTYPE html>
    <html lang="ja">
    <head>
        <meta charset="UTF-8">
        <title>入力フォーム</title>
    </head>
    <body>
    <h1>入力フォーム</h1>
    <form action="/user" method="POST">
        name <input type="text" name="name"><br>
        age <input type="text" name="age"><br>
        <button type="submit">送信</button>
    </form>
    </body>
    </html>

  4. 確認方法
  • http://server:3000/
    POSTする入力フォームが表示される
  • http://server:3000/user
    GETで登録一覧がJSON形式で出力される
以上、作業途中メモ。

2020年7月19日日曜日

M5Stack COCOA Counter + ENV.2 Sensor + GPS Unit その2

主に「M5Stack COCOA Counter + ENV.2 Sensor + GPS Unit」の補足情報です。

【今回のハード構成】
【各ユニットの接続】


【SDカードのログ出力例】
以下のようなログをファイルとして出力される。
緯度経度は一部数値をnで置き換えてます。
Loc: 35.nnnnnn 139.nnnnnn
2020/07/18 13:57:34.00 UTC
Sum5 Cocoa1
Tmp:  28.9C
Hum: 69.3%
Prs: 1013hPa

【バッテリーでの動作時間】
上記の【今回のハード構成】で、一晩窓際に置いてどのぐらいバッテリーが持つか、
位置情報の精度はどの程度か、確認してみた。
尚、増設のM5Stack用電池モジュールの他に、M5Stack Basicの底モジュールにも
小さいながらバッテリーが搭載されている。
あちこちのサイトに「2つのバッテリーを同時に搭載してはダメ」と書いてあるが、
まぁ実験なので、承知の上でやってみた(^^;
  1. バッテリー動作開始時刻
    上記のログが、バッテリーで動作させた際の最初の記録である。
    UTCとJSTは9時間の時差があるので、日本時間では2020/07/18の
    23時ちょっと前というところ。

  2. 最終ログ
    朝起きて、M5Stackを見て見たら、動作が止まっていた。
    microSDを取り外して、ログの最終データを見たところが、下記。
    ざっくり6時間動いている。
Loc: 35.nnnnnn 139.nnnnnn
2020/07/18 19:47:27.00 UTC
Sum4 Cocoa1
Tmp: 23.9C
Hum: 84.2%
Prs: 1012hPa 
【GPSの位置精度】
最終ログに出力されている緯度経度を緯度経度地図で確認してみた。
窓際に置いておいただけだけど、数m程度の誤差しかなかった。
結構優秀(^^)
 
【買っとけばよかったハード】

M5Stack COCOA Counter + ENV.2 Sensor + GPS Unit

【主な機能】
  • M5Stackの内蔵BLEを使って、厚労省の接触確認アプリCocoaを検出するもの。
  • BLE全体で検出した台数と内数としてのCoCoa台数を表示する。
  • 検出した情報は、microSDにログファイルとして記録する。
  • M5Stack Basicに温度湿度気圧センサであるENV.2 UnitをGROVE経由で接続し、
    それらの情報もついでに表示・記録する。
  • GPS Unitを接続し、検出した時の位置情報と日時を記録する。
【付加機能】
  • ボタンA(左)を押すと、Cocoa検出時のBeep音をon/offさせる。
  • ボタンB(中)を押すと、LCDのサイクリックに変わる。
  • ボタンC(右)を押すと、画面とログファイルに「memo」と出力する。
    何か気付いたことがあった時のイベント記録用。
【余談】
 追加で購入したGPS UnitのGROVEコネクタはUARTだった。
 M5StackのGROVEコネクタはENV.2 Sensorで埋まっているし、
 そもそもI2Cしか使えないようだし。

 ということで、UART2ポートに無理やり接続。
 最初は動かなくて悩んだが、M5Stack側TX2にGPS側RX、
 M5Stack側RX2にGPS側TXを繋ぐと動いた(^^;

    #UART(シリアル通信)なんで、考えてみれば当たり前なんだが、
    #こんなこともパッと思い出せないほどオッサン化が...。

 電池が届いたら、RTCも接続するかな。

[code]
/*
   Based on Neil Kolban example for IDF: https://github.com/nkolban/esp32-snippets/blob/master/cpp_utils/tests/BLE%20Tests/SampleScan.cpp
   Ported to Arduino ESP32 by Evandro Copercini
*/
/*
   Thanks to https://gist.github.com/ksasao/0da6437d3eac9b2dbd675b6fee5d1117
   by https://gist.github.com/ksasao
*/
/*
   This sample sketch demonstrates the normal use of a TinyGPS++ (TinyGPSPlus) object.
   by Mikal Hart
*/
/*
   SD card wrie routine
   https://raspberrypi.mongonta.com/howto-write-csv-to-sdcard-on-m5stack/
*/

//////////////////////////////////////////////////////////////////////////////////
#include <M5Stack.h>
#include <TinyGPS++.h>
#include <BLEDevice.h>

//////////////////////////////////////////////////////////////////////////////////
/*
   note: need add library Adafruit_BMP280 & Adafruit_SHT31 from library manage
*/
#include <Adafruit_SHT31.h>
#include <Wire.h> //The SHT31 uses I2C comunication.
#include <Adafruit_Sensor.h>
#include <Adafruit_BMP280.h>

//////////////////////////////////////////////////////////////////////////////////
#include <SPI.h>
#include <SD.h>

//////////////////////////////////////////////////////////////////////////////////
Adafruit_SHT31 sht31 = Adafruit_SHT31();
Adafruit_BMP280 bme;

//time out in seconds
int scanTime = 5;
BLEScan* pBLEScan;

const int chipSelect = 4;

TinyGPSPlus gps; // The TinyGPS++ object
HardwareSerial hsGps(2);// The serial connection to the GPS device

//接触確認アプリのUUID
const char* uuid = "0000fd6f-0000-1000-8000-00805f9b34fb";
int cocoaCnt = 0;

//log file name
const char* logfile = "/log.txt";

//文字列
const char* sumdevStr = "Sum";
const char* cocoaStr = " Cocoa";
const char* envStr = "Tmp: %3.1fC\r\nHum: %3.1f%%\r\nPrs: %3.0fhPa\r\n";
const char* locStr = "Loc: %lf %lf\r\n";
const char* dateStr = "%d/%02d/%02d ";
const char* timeStr = "%02d:%02d:%02d.%02d UTC\r\n";

//RTCまたはGPS
//bool hasRTC = false;
bool hasGPS = false;

//Sensor flag
bool hasSHT31 = false;
bool hasBMP280 = false;
float tmp = 100;
float hum = 0;
float pressure = 0;

//Other flags,Params
bool onBeep = true;
unsigned char bright = 0x03;
unsigned char brightPitch = 0x10;
static const uint32_t GPSBaud = 9600;
//////////////////////////////////////////////////////////////////////////////////
class MyAdvertisedDeviceCallbacks: public BLEAdvertisedDeviceCallbacks {
    void onResult(BLEAdvertisedDevice advertisedDevice) {
      if (advertisedDevice.haveServiceUUID()) {
        if (strncmp(advertisedDevice.getServiceUUID().toString().c_str(), uuid, 36) == 0) {
          cocoaCnt++;
          if (onBeep) {
            M5.Speaker.beep();
            delay(10);
            M5.Speaker.mute();
          }
          M5.Lcd.setCursor(0, 110);
          M5.Lcd.setTextSize(2);
          M5.Lcd.setTextColor(GREEN, BLACK);
          M5.Lcd.printf("%d ", cocoaCnt);
          M5.Lcd.setTextSize(1);
        }
      }
      M5.Lcd.println(advertisedDevice.toString().c_str());
      M5.Lcd.setTextSize(1);
      M5.Lcd.setTextColor(WHITE, BLACK);
    }
};

//////////////////////////////////////////////////////////////////////////////////
void setup() {

  // Initialize the M5Stack
  M5.begin();
  M5.Power.begin();
  M5.Lcd.setBrightness(bright);
  M5.Lcd.setTextSize(1);
  M5.Lcd.println("Hello!, COCOA Scan");

  Serial.begin(115200);

  //BLE setup
  BLEDevice::init("");
  pBLEScan = BLEDevice::getScan(); //create new scan
  pBLEScan->setAdvertisedDeviceCallbacks(new MyAdvertisedDeviceCallbacks());
  pBLEScan->setActiveScan(true); //active scan uses more power, but get results faster
  pBLEScan->setInterval(100);
  pBLEScan->setWindow(99);  // less or equal setInterval value

  //ENV sensor on I2C setup
  Wire.begin();
  Serial.println(F("ENV.2 Chk"));

  if (sht31.begin(0x44)) {   // Set to 0x45 for alternate i2c addr
    hasSHT31 = true;
    Serial.println("SHT31 Ok");

    Serial.print("Heater: ");
    if (sht31.isHeaterEnabled())
      Serial.println("Enable");
    else
      Serial.println("Disable");
  }

  if (bme.begin(0x76)) {
    hasBMP280 = true;
    Serial.println("BMP280 Ok");
  }

  //GPS setup
  hsGps.begin(GPSBaud);
  delay(500);

  if (hsGps.available() > 0) {
    hasGPS = true;
    Serial.println("GPS Ok");
  }
}

void loop() {
  // print all found BLE devices
  M5.Lcd.setTextSize(1);

  if (hasGPS) {
    while (hsGps.available() > 0) {
      gps.encode(hsGps.read());
    }
    Serial.printf(locStr, gps.location.lat(), gps.location.lng());
    Serial.printf(dateStr, gps.date.year(), gps.date.month(), gps.date.day() );
    Serial.printf(timeStr, gps.time.hour(), gps.time.minute(), gps.time.second(), gps.time.centisecond());
  }

  BLEScanResults foundDevices = pBLEScan->start(scanTime, false);

  // clear screen and set cursor to the top
  M5.Lcd.fillScreen(BLACK);
  M5.Lcd.setCursor(0, 0);
  M5.Lcd.setTextSize(2);
  M5.Lcd.setTextColor(WHITE, BLACK);
  M5.Lcd.printf(dateStr, gps.date.year(), gps.date.month(), gps.date.day() );
  M5.Lcd.printf(timeStr, gps.time.hour(), gps.time.minute(), gps.time.second(), gps.time.centisecond());

  // print counts of BLE devices
  int sumdev = foundDevices.getCount();

  M5.Lcd.setTextSize(3);
  M5.Lcd.print(sumdevStr);
  M5.Lcd.setTextColor(RED, BLACK);
  M5.Lcd.print(sumdev);

  // print count of cocoa APPs
  M5.Lcd.setTextColor(WHITE, BLACK);
  M5.Lcd.print(cocoaStr);
  M5.Lcd.setTextColor(GREEN, BLACK);
  M5.Lcd.println(cocoaCnt);

  // print env2 data
  if (hasSHT31) {
    tmp = sht31.readTemperature();
    hum = sht31.readHumidity();
  }
  if (hasBMP280) {
    pressure = bme.readPressure() / 100;
    // hPa = Pa / 100;
  }

  M5.Lcd.setTextColor(WHITE, BLACK);
  M5.Lcd.printf(envStr, tmp, hum, pressure);

  // print to the serial port too
  Serial.print(sumdevStr);
  Serial.print(sumdev);
  Serial.print(cocoaStr);
  Serial.println(cocoaCnt);
  Serial.printf(envStr, tmp, hum, pressure);
  Serial.println();

  // SDカードへの書き込み処理(ファイル追加モード)
  // SD.beginはM5.begin内で処理されているので不要
  // open the file. note that only one file can be open at a time,
  // so you have to close this one before opening another.
  File dfile = SD.open(logfile, FILE_APPEND);

  // if the file is available, write to it:
  if (dfile) {
    dfile.printf(locStr, gps.location.lat(), gps.location.lng());
    dfile.printf(dateStr, gps.date.year(), gps.date.month(), gps.date.day() );
    dfile.printf(timeStr, gps.time.hour(), gps.time.minute(), gps.time.second(), gps.time.centisecond());
    dfile.print(sumdevStr);
    dfile.print(sumdev);
    dfile.print(cocoaStr);
    dfile.println(cocoaCnt);
    dfile.printf(envStr, tmp, hum, pressure);
    dfile.println();

  }

  //Button controll
  M5.Lcd.setTextSize(3);
  M5.Lcd.println();
  M5.Lcd.setTextColor(BLUE, WHITE);
  M5.Lcd.println("A: Beep on/off");
  M5.Lcd.println("B: Brightness");
  M5.Lcd.println("C: Memo");

  int timer = 100;
  while (timer--) {
    if (M5.BtnA.wasReleased()) { //Aボタンでbeepをon/off切り替える
      onBeep = !onBeep;
    } else if (M5.BtnB.wasReleased()) { //Bボタンで輝度を変更
      bright += brightPitch;
      M5.Lcd.setBrightness(bright);
    } else if (M5.BtnC.wasReleased()) { //Cボタンでevent記録
      dfile.println("Memo");
      M5.Lcd.setTextColor(YELLOW, BLACK);
      M5.Lcd.println("Wrote");
    }
    delay(70);
    M5.update(); // update button state
  }

  //init for next loop
  dfile.close();
  pBLEScan->clearResults();   // delete results fromBLEScan buffer to release memory
  cocoaCnt = 0;

  M5.Lcd.setTextColor(WHITE, BLACK);
  M5.Lcd.setCursor(0, 110);
  M5.Lcd.setTextSize(1);

}
// Arranged and written by 柴田(ひ)
[/code]

2020年7月16日木曜日

M5Stack COCOA Counter & ENV.2 Sensor


[code]
/*
   Based on Neil Kolban example for IDF: https://github.com/nkolban/esp32-snippets/blob/master/cpp_utils/tests/BLE%20Tests/SampleScan.cpp
   Ported to Arduino ESP32 by Evandro Copercini
*/
/*
   Thanks to https://gist.github.com/ksasao/0da6437d3eac9b2dbd675b6fee5d1117
   by https://gist.github.com/ksasao
*/
/*
   SD card wrie routine
   https://raspberrypi.mongonta.com/howto-write-csv-to-sdcard-on-m5stack/
*/

//////////////////////////////////////////////////////////////////////////////////
#include <M5Stack.h>

#include <BLEDevice.h>
//#include <BLEUtils.h>
//#include <BLEScan.h>
//#include <BLEAdvertisedDevice.h>

//////////////////////////////////////////////////////////////////////////////////
/*
   note: need add library Adafruit_BMP280 & Adafruit_SHT31 from library manage
*/
#include <Adafruit_SHT31.h>
#include <Wire.h> //The SHT31 uses I2C comunication.
#include <Adafruit_Sensor.h>
#include <Adafruit_BMP280.h>

//////////////////////////////////////////////////////////////////////////////////
#include <SPI.h>
#include <SD.h>

//////////////////////////////////////////////////////////////////////////////////
Adafruit_SHT31 sht31 = Adafruit_SHT31();
Adafruit_BMP280 bme;

//time out in seconds
int scanTime = 5;
BLEScan* pBLEScan;

const int chipSelect = 4;

//接触確認アプリのUUID
const char* uuid = "0000fd6f-0000-1000-8000-00805f9b34fb";
int cocoaCnt = 0;

//log file name
const char* logfile = "/datalog.txt";

//文字列
const char* sumdevStr = "Sum";
const char* cocoaStr = " Cocoa";
const char* envStr = "Temp:  %3.1fC\r\nHumid: %3.1f%%\r\nPress: %3.0fhPa\r\n";
//RTC買うまで固定
const char* dateStr = "2020.07.15 10:10:00 ";

//Sensor flag
bool hasSHT31 = false;
bool hasBMP280 = false;
float tmp = 100;
float hum = 0;
float pressure = 0;

//Other flags,Params
bool onBeep = true;
int bright = 20;
int brightPitch = 10;
//////////////////////////////////////////////////////////////////////////////////
class MyAdvertisedDeviceCallbacks: public BLEAdvertisedDeviceCallbacks {
    void onResult(BLEAdvertisedDevice advertisedDevice) {
      if (advertisedDevice.haveServiceUUID()) {
        if (strncmp(advertisedDevice.getServiceUUID().toString().c_str(), uuid, 36) == 0) {
          cocoaCnt++;
          if (onBeep) {
            M5.Speaker.beep();
            delay(10);
            M5.Speaker.mute();
          }
          M5.Lcd.setCursor(0, 110);
          M5.Lcd.setTextSize(2);
          M5.Lcd.setTextColor(GREEN, BLACK);
          M5.Lcd.printf("%d ", cocoaCnt);
          M5.Lcd.setTextSize(1);
        }
      }
      M5.Lcd.println(advertisedDevice.toString().c_str());
      M5.Lcd.setTextSize(1);
      M5.Lcd.setTextColor(WHITE, BLACK);
    }
};

//////////////////////////////////////////////////////////////////////////////////

void setup() {

  // Initialize the M5Stack
  M5.begin();
  M5.Power.begin();
  M5.Lcd.setBrightness(bright);
  M5.Lcd.setTextSize(1);
  M5.Lcd.println("Hello!, cacoa BLE Scan");

  BLEDevice::init("");
  pBLEScan = BLEDevice::getScan(); //create new scan
  pBLEScan->setAdvertisedDeviceCallbacks(new MyAdvertisedDeviceCallbacks());
  pBLEScan->setActiveScan(true); //active scan uses more power, but get results faster
  pBLEScan->setInterval(100);
  pBLEScan->setWindow(99);  // less or equal setInterval value

  Wire.begin();
  Serial.println(F("ENV2 Unit(SHT31 and BMP280) test..."));

  if (sht31.begin(0x44)) {   // Set to 0x45 for alternate i2c addr
    hasSHT31 = true;
    Serial.println("Found SHT31");

    Serial.print("Heater Enabled State: ");
    if (sht31.isHeaterEnabled())
      Serial.println("ENABLED");
    else
      Serial.println("DISABLED");
  }

  if (bme.begin(0x76)) {
    hasBMP280 = true;
    Serial.println("Found a valid BMP280 sensor");
  }

}

void loop() {
  // print all found BLE devices
  M5.Lcd.setTextSize(1);
  BLEScanResults foundDevices = pBLEScan->start(scanTime, false);

  // clear screen and set cursor to the top
  M5.Lcd.fillScreen(BLACK);
  M5.Lcd.setCursor(0, 0);
  M5.Lcd.setTextSize(2);
  M5.Lcd.setTextColor(WHITE, BLACK);
  M5.Lcd.println(dateStr);

  // print counts of BLE devices
  int sumdev = foundDevices.getCount();

  M5.Lcd.setTextSize(3);
  M5.Lcd.print(sumdevStr);
  M5.Lcd.setTextColor(RED, BLACK);
  M5.Lcd.print(sumdev);

  // print count of cocoa APPs
  M5.Lcd.setTextColor(WHITE, BLACK);
  M5.Lcd.print(cocoaStr);
  M5.Lcd.setTextColor(GREEN, BLACK);
  M5.Lcd.println(cocoaCnt);

  // print env2 data
  if (hasSHT31) {
    tmp = sht31.readTemperature();
    hum = sht31.readHumidity();
  }
  if (hasBMP280) {
    pressure = bme.readPressure() / 100;
    // hPa = Pa / 100;
  }

  M5.Lcd.setTextColor(WHITE, BLACK);
  M5.Lcd.printf(envStr, tmp, hum, pressure);

  // print to the serial port too
  Serial.println(dateStr);
  Serial.print(sumdevStr);
  Serial.println(sumdev);
  Serial.print(cocoaStr);
  Serial.println(cocoaCnt);
  Serial.printf(envStr, tmp, hum, pressure);

  // SDカードへの書き込み処理(ファイル追加モード)
  // SD.beginはM5.begin内で処理されているので不要
  // open the file. note that only one file can be open at a time,
  // so you have to close this one before opening another.
  File dfile = SD.open(logfile, FILE_APPEND);

  // if the file is available, write to it:
  if (dfile) {
    dfile.println(dateStr);
    dfile.print(sumdevStr);
    dfile.print(sumdev);
    dfile.print(cocoaStr);
    dfile.println(cocoaCnt);
    dfile.printf(envStr, tmp, hum, pressure);

    dfile.close();
  }

  //Button controll
  M5.Lcd.setTextSize(3);
  M5.Lcd.println("");
  M5.Lcd.setTextColor(BLUE, WHITE);
  M5.Lcd.println("A: Beep on/off");
  M5.Lcd.println("B: DOWN bright");
  M5.Lcd.println("C: UP   bright");

  int timer = 100;
  while (timer--) {
    if (M5.BtnA.wasReleased()) { //Aボタンでbeepをon/off切り替える
      onBeep = !onBeep;
    } else if (M5.BtnB.wasReleased()) { //Bボタンで輝度を下げる
      bright -= brightPitch;
    } else if (M5.BtnC.wasReleased()) { //Cボタンで輝度を上げる
      bright += brightPitch;
    }
    M5.Lcd.setBrightness(bright);
    delay(70);
    M5.update(); // update button state
  }

  //init for next loop
  M5.Lcd.setTextColor(WHITE, BLACK);
  M5.Lcd.setCursor(0, 110);
  M5.Lcd.setTextSize(1);


  pBLEScan->clearResults();   // delete results fromBLEScan buffer to release memory
  cocoaCnt = 0;

}
// Arranged and written by 柴田(ひ)
[/code]

2020年7月14日火曜日

M5Stack用環境センサユニット ver.2(ENV II)の動作テスト

とりあえず、動いた。


M5StackのサンプルコードがENV. IIではなく、旧版のENVのものしかなく、
センサーの種類が違ったので、ちょいと手間取った。


/*
   note: need add library Adafruit_BMP280 & Adafruit_SHT31 from library manage */ #include <M5Stack.h> #include <Adafruit_SHT31.h> #include <Wire.h> //The SHT31 uses I2C comunication. #include <Adafruit_Sensor.h> #include <Adafruit_BMP280.h> Adafruit_SHT31 sht31 = Adafruit_SHT31(); //DHT12 dht12; //Preset scale CELSIUS and ID 0x5c. Adafruit_BMP280 bme; void setup() {  M5.begin();  M5.Power.begin();  Wire.begin();  M5.Lcd.setBrightness(10);  Serial.println(F("ENV2 Unit(SHT12 and BMP280) test..."));  if (! sht31.begin(0x44)) {   // Set to 0x45 for alternate i2c addr    Serial.println("Couldn't find SHT31");    while (1) delay(1);  }  Serial.print("Heater Enabled State: ");  if (sht31.isHeaterEnabled())    Serial.println("ENABLED");  else    Serial.println("DISABLED");  if (! bme.begin(0x76)) {    Serial.println("Could not find a valid BMP280 sensor, check wiring!");    M5.Lcd.println("Could not find a valid BMP280 sensor, check wiring!");    while (1) delay(1);  }  M5.Lcd.clear(BLACK);  M5.Lcd.println("ENV Unit test..."); } void loop() {  float tmp = sht31.readTemperature();  float hum = sht31.readHumidity();  float pressure = bme.readPressure() /100 ;  Serial.printf("Temperatura: %2.2f*C  Humedad: %0.2f%%  Pressure: %0.2fhPa\r\n", tmp, hum, pressure);  M5.Lcd.setCursor(0, 0);  M5.Lcd.setTextColor(WHITE, BLACK);  M5.Lcd.setTextSize(3);  M5.Lcd.printf("Temp: %2.1fC  \r\nHumi: %2.0f%%  \r\nPressure:%2.0fhPa\r\n", tmp, hum, pressure);  delay(1000); }